
Introduction to Scheduling tool v2.0 / Shift Planner
Overview
The Scheduling Tool in NextGen Workforce allows managers and schedulers to create, assign, copy, and manage employee shifts with ease. Whether you’re publishing open shifts, assigning shifts in bulk, or copying weekly schedules, this tool simplifies everything—on both web and mobile views.
Accessing the Scheduling Tool
Navigation:
Login → Dashboard → Access Web Timeclock → Shift Planner

Once inside the Scheduling Tool, you’ll see a calendar view grouped by departments. You can toggle between views and apply filters as needed (explained below).
Creating, Publishing, Assigning, and Claiming Open Shifts
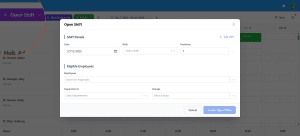
Creating Open Shifts
Steps to Create:
- Click the Open Shift button (top-left).
- Select Create → A pop-up will open.
- Fill in:
- Date
- Shift (from dropdown)
- Positions (number of employees needed)
- Select eligible employees/departments/groups.
- Click Create Open Shifts
Publishing Open Shifts
Steps to Publish:
- Click the Publish button. → Select Open Shifts
- A modal appears to assign employees.
- Under each shift, search & select eligible employees.
- Click Assign Shifts
Refer to the screenshot “Assign Published Open Shifts.”

Assigning Published Open Shifts to Employees
Once your open shifts are created and published, you can assign them directly to employees.
Navigation:
- Click the Open Shift button
- Select “Assign” from the dropdown
- Choose the pay period (dates) for which open shifts were created
- A list of all available open shifts will appear, like the screen shown above
- Under each shift, select an employee from the Assign to Employee dropdown
- After selecting all employees, click the Assign Shifts button
You can assign multiple positions of the same shift to different employees (e.g., 3 employees for 3 positions).

Claiming Open Shifts (Employee Role)
Steps for Employees:
-
Login→Dashboard→Bell Icon -
Click on the OpenShift notification.
-
Review available shifts.
-
Click Checkout Open Shifts
-
Tap the desired shift → Click Claim
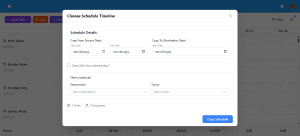
Copying Weekly Schedules
Use this when you want to reuse a previous schedule for a new week.
Steps:
- Click the Copy button (top menu).
- Enter:
- Copy From Date → Start and End
- Copy To Date
- Apply optional filters (Department, Group)
- Click Copy Schedule
Refer to the screenshot “Choose Schedule Timeline.”
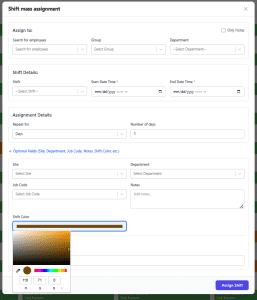
Assigning Shifts via Mass Assignment
Mass Assignment → Fill out the form:
-
Assign to: Employee, Department, or Group
-
Shift Details: Choose shift, date & time
-
Assignment Details: Repeat for multiple days if needed
Click + Optional Fields to access:
-
Site, Department, Job Code, Notes
-
Shift Color: Select a color to visually differentiate shifts
-
Tags: For example, FMLA (leave codes)
Click Assign Shift to apply across employees.
Manually Creating Shifts from Calendar
Click “+” Add Schedule block for any employee
→ Fill shift details
→ Use optional fields as needed
→ Click Assign Shift
Shift Color-coded blocks
The Shift Color field lets you visually differentiate shifts using custom colors.
-
Click on the Shift Color bar to open the color palette.
-
You can:
- Choose a color manually using the color block.
- Use the slider to adjust the hue.
- Fine-tune by entering RGB values (Red, Green, Blue).
- Use the eyedropper tool to pick a color from your screen.
Once applied, your selected color will appear as the background for the assigned shift block on the calendar, helping you quickly spot different types of shifts (e.g., On-Call, Training, Backup).
Filters
The Filter Schedules pop-up allows managers to narrow down the scheduling calendar view to focus on specific employees, departments, shifts, or date ranges. This is especially useful when managing large teams across different locations or roles.
| Field | Description |
|---|---|
| Employees | Type at least 3 characters to search and filter for specific employees. |
| Departments | Select one or more departments to view the schedules of employees in that department. |
| Sites | Useful if your organization operates from multiple locations—filter schedules by site. |
| Shifts | View only selected shifts (e.g., morning, night, or on-call). Helps in isolating specific shift types. |
| Schedule Start Date | Select the beginning date of the schedule range you want to view. |
| Schedule End Date | Set the ending date for the desired schedule view. |
Actions
- Apply Filters—Once you’ve selected your options, click this button to update the calendar view accordingly.
- Clear All Filters—Resets all filters back to the default view.
Refer to the screenshot “Filters Panel.

Quick Filters
This compact filter panel lets you quickly control how you want to view your schedule calendar in the Timeclock & Scheduling tool.
Filter Options Explained
![]()
1. View Type
Choose how the schedule should be displayed:
- Daily – Shows one day at a time.
- Weekly—Shows the schedule for the whole week (recommended view).
- Monthly—View all shifts for the month in one go.
2. Group By
Decide how you want the schedule to be grouped:
- Department—Group employees by department.
- Employee – View schedule grouped by each employee (best for tracking individual work plans).
3. View Schedules
Control the visibility of schedules:
- My schedules only – Shows only your personal schedule (for employees).
- My department – Displays schedules of your entire department.
- All schedules – See everyone’s schedule across all departments (usually for managers/admins).
4. Filter Options
Choose what types of records should be shown on the schedule:
- Schedule—Shows regular shift assignments.
- Time off—Displays planned leave and vacation days.
- Holiday – Marks holidays on the calendar.
- Unavailability—Shows when employees are unavailable to work.
- Open Shifts – Displays available shifts that employees can claim.
Quick Actions
- Set Unavailability—Quickly open the unavailability setup screen.
- View Open Shifts—Jump directly to the list of open shifts.
How to Set Unavailability in the Shift Planner
Navigation:
Login → Dashboard → Access Web Timeclock → Shift Planner → Burger icon (Top-right) → Set Unavailability

Steps to Set Unavailability
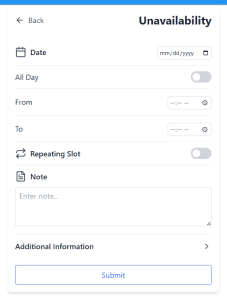
-
Select Date
Choose the date when the employee is unavailable. -
All Day Toggle
-
- Enable this if the employee is unavailable for the entire day.
- If disabled, specify the From and To time manually.
-
Enable Repeating Slot (optional)
-
- Toggle Repeating Slot ON to repeat unavailability weekly.
- Select which days it repeats on (e.g., Mon, Tue, etc.).
-
Set End Date
-
Choose the ‘Ends On’ date to stop the repetition.
-
-
Add Notes (optional)
-
Mention the reason for unavailability or any relevant details.
-
-
Submit
-
Click Submit to save the unavailability slot.
-
How to View and Manage Multiple Departments in the Scheduling Tool
In some cases, managers need access to view and manage schedules for multiple departments. This guide walks you through how a super admin can configure visibility and how a manager can access and use those department views effectively.
1: Super Admin – Create Department-Level Visibility for Managers
Only super admins can set up the configuration that allows managers to view multiple departments in the scheduling tool.
- Create a Custom Tag for Departments
- Go to:
Settings→Custom Fields - Click “Add” to create a new field:
- Field Code: Enter a unique code (e.g.,
multi_dept_view) - Field Name: A descriptive name (e.g.,
Visible Departments) - Field Type: Select
Tag Variable - Value Source: Choose
Department List
- Field Code: Enter a unique code (e.g.,
- Click “Add” to save the field

Now this custom tag will be available inside each employee’s profile under Employee Tags.
2: Assign Departments to the Manager
-
Go to Employees → Search for the manager → Click Edit
-
Navigate to: Employee Tags
-
Find the custom field you created (e.g., Visible Departments)
-
Select the departments you want this manager to access
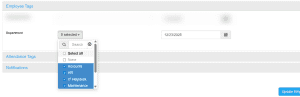
This sets up visibility for those departments in the manager’s account.
3: Manager – View and Manage Multiple Departments in Scheduling Tool
Managers can now use filters to view their assigned departments.
Accessing Schedules for Assigned Departments
-
Log in to your NextGen account
-
Click the burger menu (☰) in the top-right of the Scheduling Tool
-
Under:
-
Group By: Select Departments
-
View Schedule: Select My Departments
-
![]()
This will filter and show only the departments assigned to the manager.
4: Enable Manager Access for Shift Swapping & Unavailability Approvals
If you want managers to receive notifications and approve/reject shift swaps or unavailability requests for their departments:
-
Go to:
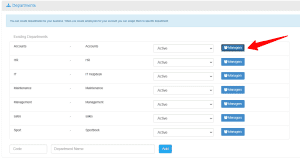
Settings→Departments -
Click the department you want to configure
-
Under Manager, select the appropriate employee(s) as department managers
Once assigned, they will automatically receive approval notifications for:
-
Shift Swapping
-
Unavailability Requests
That’s it! Managers can now view, schedule, and approve requests for multiple departments based on your configuration.
Would you like this embedded into the full Scheduling Tool help article under a new section like “Multi-Department Access for Managers”?
How to Request and Approve Time-Off Requests
Check the complete guide on how to request and approve time off.
Key Reminders
- A manager must approve claimed shifts.
- Released shifts go back to the open shift pool.
- Unavailability can be set directly from the calendar filter menu.
FAQs
Q. Why can’t I see any open shifts?
A. Check your eligibility—open shifts may be restricted by department, location, or job role.
Q. Can I withdraw my shift claim?
A. You can release a shift if it’s not yet approved.
Q. What happens when a manager rejects my shift request?
A. You’ll be notified via the app with the rejection reason.
Need Help?
For assistance, please reach out to NextGen Workforce Support.


