
How to Setup account with Intuit QuickBooks integration
Setting up your NextGen account with QuickBooks integration is straightforward and doesn’t require any technical expertise. By connecting your QuickBooks and NextGen accounts, you can streamline payroll and employee management. This guide will walk you through the process of creating your account, linking QuickBooks, importing employee data, and assigning access to your team.
Step 1: Sign-Up Process
-
Create Your Account:
-
Click here to sign up.
-
Select “Create Account” and fill in the required details.
-
After registration, you’ll be redirected to the login page.
-
-
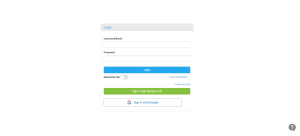
Log In:
-
Enter your email and password, then click “Login” to access your account.

-
Step 2: Configure HR/Payroll Partner Integration
-
Access Settings:
-
In your NextGen dashboard, click on the “Settings” menu located at the bottom left.
-
-
Select Integration:
-
Navigate to “HR/Payroll Partner Integration”.
-
Choose “QuickBooks” or “QuickBooks Online” for Employee & Payroll Management.
-

Step 3: Authorize Integration with Intuit QuickBooks
-
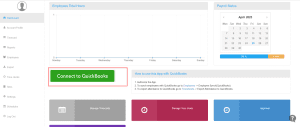
Connect to QuickBooks:
-
After selecting QuickBooks in Step 2, click “Connect to QuickBooks” from the Dashboard.
-
-
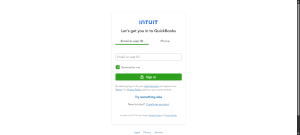
Sign In to QuickBooks:
-
You’ll be redirected to the QuickBooks sign-in page.
-
Enter your QuickBooks account credentials and sign in.
-
-
Authorize Integration:
-
Once logged in, confirm the integration by clicking “Authorize”.
-
Step 4: Sync Employees with QuickBooks Online
-
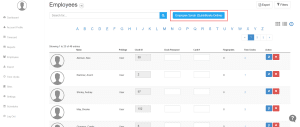
Access Employee Sync:
-
Log in to your NextGen Workforce account.
-
Navigate to the Employees menu.
-
-
Import Employee Data:
-
Click on “Employee Sync (QuickBooks Online)” to import employee information.
-
Step 5: Granting Employee Access and Setting Roles
To ensure secure system access and allow employees to use mobile applications or time clocks, you must assign proper credentials and privileges.
Setting Up Employee Access:
-
Log In to Admin Account:
-
Sign into your administrator dashboard.
-
-
Navigate to Employees Section:
-
Go to: Dashboard > Employees
-
-
Search for the Employee:
-
Use the search bar to locate the employee you wish to modify.
-
-
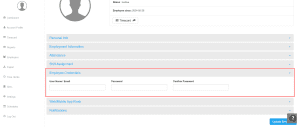
Assign Credentials:
-
You can either use the employee’s email address or assign a custom username and password, which can be set as a default for all users or personalized for each individual.
-
Understanding Access Privileges & Login Profiles:
To manage what each employee can see or do within the system, you’ll need to assign access privileges through a login profile. This determines the user’s permission levels for viewing reports, updating timecards, using scheduling tools, and more.
🔗 Learn how to configure Access Privileges and Login Profiles here:
👉 Access Privileges & Login Profiles – Step-by-Step Guide
You’ve Successfully Set Up Your NextGen Account with QuickBooks Integration!
Congratulations! You’ve now completed the integration process between NextGen Workforce and Intuit QuickBooks, including user access configuration, payroll syncing, and mobile app setup. This seamless connection not only reduces administrative overhead but also keeps employee records and payroll data synchronized in real-time.
For more assistance with managing login roles, permissions, and integrations, be sure to explore our other help center articles.
Need Additional Assistance?
We’re here to help! If you have questions or need technical support:


