
How to Create Unavailability in the Scheduling Calendar
Overview
If you’re unavailable to work during specific days or times, NextGen Workforce allows you to easily block out your unavailability directly from your employee account. This ensures that schedulers do not assign you to shifts during those periods.
Steps to Create Unavailability
1: Log In as the Employee
To create unavailability, log in using your employee credentials on NextGen Workforce.
2: Open “Access Web Timeclock”
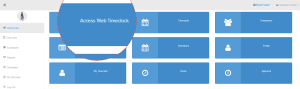
3: Today’s Shifts → Gear icon ⚙️→ Set Unavailability.
4: Unavailability Screen will Open.
5: Enter Date Range
Fill in the Start Date and End Date for when you will be unavailable.
Choose Availability Type
You can set unavailability in three different ways:
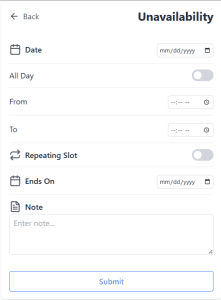
1. Set a Full-Day Block
If you’re unavailable for the full day(s), enable the All Day toggle.
2. Block Only Certain Hours
If you’re only unavailable during certain hours, disable the “All Day” toggle and:
- Enter your Start Time
- Enter your End Time
3. Repeat Weekly or Monthly
If you’ll be unavailable on the same day(s) over multiple weeks:
- Enable the Repeating Slot toggle
- Select the days you’re unavailable (e.g., every Tuesday & Thursday)
- Set the time (either full day or specific hours)
Additionally, You can add a note while setting unavailability.
Submit Your Request
Fill in all the required information.
- Click Submit
- Your unavailability will now be reflected in the scheduling calendar
How to Set Unavailability for a Different Department
This article explains how employees can request unavailability for a department other than their base department.
Prerequisites
-
The employee must be assigned to a department in the system.
-
For customers using BambooHR, departments are synced directly from BambooHR. Therefore, each employee will already be assigned to a base department based on the BambooHR configuration.
Steps to Set Unavailability for a Different Department
-
Follow the standard steps to create an Unavailability Request mentioned above.
-
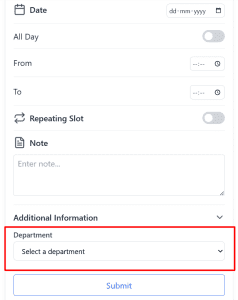
During the request process, click on Additional Info.
-
From the department selection option, choose the department for which you want to request unavailability (instead of the base department).
-
Submit the request.

Important Note
-
Once an unavailability request is submitted for a different department, the request must be approved by the manager of that selected department.
-
Approval will not be handled by the employee’s base department manager, even if the employee primarily belongs to that department.
-
Where to View Your Unavailability
You can view your submitted unavailability in the My Schedule section of the Scheduling Calendar. This ensures transparency and lets you double-check that your time off is blocked.
Things to Remember
- Unavailability must be submitted in advance before schedules are published.
- Recurring slots save time for weekly patterns.
Need Help?
For assistance, please reach out to your manager or contact NextGen Workforce Support.


