
Custom Fields in NextGen Workforce: A Step-by-Step Guide
Custom Fields in NextGen Workforce: A Step-by-Step Guide
What Are Custom Fields?
Custom Fields in NextGen Workforce allow you to capture additional information about employees that your business needs. These fields let you add personalized data to employee profiles beyond the standard fields like name, department, or email.
Why Use Custom Fields?
- To store important, company-specific employee details (e.g., uniform size, project code).
- To enhance reporting and filtering during payroll and HR processes.
- To track and manage operational details seamlessly in one place.
Types of Custom Fields
When you create a Custom Field in NextGen Workforce, you can choose from three field types based on the information you want to capture:

- Text
Allows you or employees to enter free text.
Examples:
-
Emergency Contact Name
-
Job Code
-
BirthDate
Use this when employees need to type in specific details.
-
- Dropdown
Allows you to create a list of options from which employees or admins can select.Examples:- Employee type (salaried, non-salaried)
- Department Names (HR, Sales, IT)
- Project Codes (Alpha, Beta, Gamma)
This ensures consistency across employee data.
- Tag Variable
The Tag Variable field type is a special option that allows you to dynamically assign custom approvers for employees within approval workflows.It is used to manage who will approve requests (like time-off or timesheet approvals) based on employee-specific configurations.
Using the “Tag Variable” Field Type
What is a Tag Variable?
The tag variable helps you automatically route requests to the correct approver for each employee without manually assigning an approver for every approval.
When Should You Use It?
- When different employees need different approvers, such as site-specific supervisors or team leads.
- When you want to automate workflows while maintaining flexibility.
How Does It Work?
- You create a Tag Variable custom field (e.g., “Alternate Approver”).
- You assign this field to each employee’s profile, setting it to the specific employee who will act as their approver.
- In your Approval Workflow settings, you configure the workflow to use this Tag Variable to dynamically select the approver based on the employee’s profile.
Example Scenario
Suppose John is a ‘Site Supervisor’ and should approve requests for a specific set of employees when their direct manager is unavailable.
Instead of manually assigning John each time, you can:
- Create a Tag Variable custom field called “Alternate Approver”.
- Assign John as the “Alternate Approver” in the profiles of the relevant employees.
- Configure the approval workflow to use this field to route requests to John automatically.
Step-by-Step: Setting Up a Tag Variable Custom Field
Create the Tag Variable Field
- Navigate to Settings > Custom Fields in your NextGen Workforce account.
- Enter a unique code (e.g., alt_approver) and a clear name (e.g., Alternate Approver).
- Set Field Type to Tag Variable. The system will automatically use the employee list for this field.
- Choose:
- Single: If each employee will have one approver.
- Multiple: If you want to allow multiple approvers.
- Click ‘Add’ to save the field.


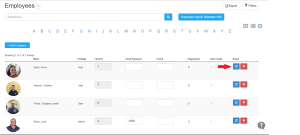
Assign the Tag Variable to Employees
- Go to the Employee Profile > Employee Tags section.
- For each employee, assign the desired approver (e.g., John) using the Tag Variable field.
- Save your changes.
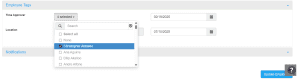
Before setting up this:
Please ensure :
- Approval workflow is assigned to employees
- Payroll- cycle is assigned to employees
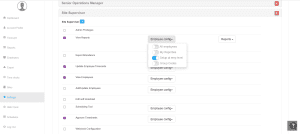
Configure Approver Access Privileges
Ensure that your designated approvers have the correct permissions to approve requests:
- Navigate to Settings > Login Profiles.
- Search for the role of the approver (e.g., “Site Supervisor”).
- Click on the role to view and edit permissions.
- For necessary privileges (View Reports, Approve Timesheets, etc.):
- Click the dropdown next to each privilege.
- Choose Employee Config.
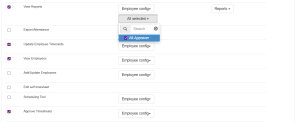
- Enable “Set Up at Employee Level.”
- Under “Select Flex Field”, select your Tag Variable custom field (e.g., Alternate Approver).
- Click Save to apply changes.

Why This Matters
- Automates approval routing for time-off and shift swap requests.
- Reduces manual work for HR and managers.
- Supports dynamic, scalable approval structures for different sites, teams, or conditions.
- Keeps your workflows organized while maintaining flexibility.
Need Help?
If you need further guidance on creating or using Tag Variables in NextGen Workforce, please reach out to NextGen Workforce Support at care@ngworkforce.com. We’re here to help you simplify and streamline your HR operations.


