
Access Privilege and Login Profile
Overview
Access privileges in NextGen Attendance Management Solutions define user permissions, ensuring that only authorized users can access specific modules. These settings enhance data security and maintain system integrity by restricting unauthorized access.
By properly setting access privileges, organizations can:
- Control who can view, edit, or manage different features.
- Prevent unauthorized access to sensitive employee data.
- Ensure efficient delegation of roles and responsibilities.
Different Types of Access Levels
NextGen offers different levels of access based on user roles, ensuring controlled access to system functionalities.
1. Super Admin
The Super Admin has full control over all modules within NextGen. This role is responsible for:
-
Managing system-wide settings and configurations.
-
Setting up and managing third-party integrations (e.g., BambooHR, QuickBooks) for seamless data synchronization.
-
Assigning and modifying access privileges for other users.
2. Admin
The Admin has broad access and can:
-
Delegate access by setting up login profiles or access privileges for subordinates.
-
Manage all modules and oversee system operations.
3. Manager / Supervisor
-
Super Admins and Admins can delegate access to Managers or Supervisors.
-
Managers can be given access to all or selective modules based on business needs.
4. Employee
By default, employees have access to:
-
Viewing their own timesheets.
-
Submitting PTO (Paid Time Off) requests.
How to Create Access Privileges
Except for the Super Admin, the system automatically assigns default employee access to all users during account setup. Additional access privileges can be defined as needed.
Steps to Create Access Privileges
1. Job Title Setup
Before creating login access, define the job title and access privileges:
-
If BambooHR is integrated, the system automatically retrieves the job title from BambooHR.
-
The job title can then be used to assign the appropriate login access in NextGen.
2. My Reportees
Users can manage reportees based on organizational hierarchy levels.
Levels of My Reportees:
-
Level 1 – Users can manage only their direct reportees.
-
Level 2 – Users can manage their direct reportees and the reports of Level 1 subordinates.
-
Level 3 – Users can manage all users in their hierarchy, including Level 2 users and their reportees.
3. Employee-Level Access Setup
This feature allows for custom reporting hierarchies and assigning custom access fields to employees.
Managing Access Privileges Using Groups
This feature allows for dividing employees into distinct groups, making access management more efficient.
-
When employees log in, they will have access only to predefined permissions based on:
-
Their login profile.
-
The group(s) they belong to.
-
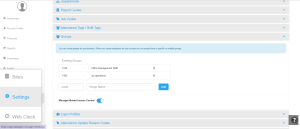
Steps to Create Groups
Navigation Path: How to create Groups
-
Employees within the same group inherit common access settings, simplifying access control.

Understanding Access Privileges and how to assign it to managers for employee access!
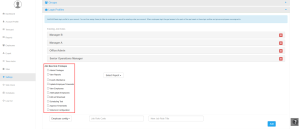
Below are the different types of access that can be assigned:
-
Admin Access – Grants full access to all modules.
-
Export Attendance – Allows Managers/Supervisors to export attendance records.
-
View Reports – Grants access to specific reports.
-
Update Employee Time Cards – Allows modifying timesheets.
-
View Employees – Grants access to view employees within assigned groups.
-
Scheduling Tool – Enables access to shift scheduling.
-
Add/Update Employees – Allows adding and updating employee information.
-
Edit Self Timesheet – Allows employees to modify their own timesheets.
-
Approve Timesheet – Allows employees to approve their own timesheets when assigned an approval workflow.
Only Super Admins can assign access privileges to manager roles.
Steps:
- Go to Login Profiles/Job Roles
- Click the job role you want to configure.
- Select the privileges.
- Check the boxes for the access you want to assign (e.g., View Employees, Export Attendance).
- Click the dropdown next to the privilege.
- Click Employee Config, a dropdown will appear.
- Choose the access level:
1. All Employees
2. My Reportees
3. Set Up at Employee Level
4. Group Codes - If using Group Codes, enable the toggle.
- A dropdown will appear to select group names.
- Select the required groups.
- The manager will get access only for the selected groups.
- In the right corner, click on the “Save” to apply chnages.
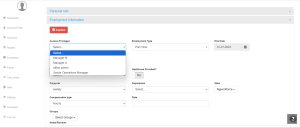
How to Assign Access Privileges to Employees
Follow this navigation path to assign access privileges based on job title, group, or individual requirements.
Navigation Path:
Dashboard > Employee > Employee Edit > Employment Information > Access Privileges > Update.
For additional assistance, contact support!