
Getting Started with the Access Control System
Overview
An Access Control System helps organisations manage secure entry and track attendance efficiently. This guide walks you through the installation, setup, and operation of the system, including key features such as face recognition, payroll integration, and emergency exit procedures.


1. Connect with Local Experts or Installers
Before setting up the system, consult access control specialists or professional installers. They will:
- Assist with installation and configuration based on your needs.
- Ensure the system integrates smoothly with existing infrastructure.
2. Add Access Control to Your Online Account
Once installed, you can easily integrate the system into your online account via WiFi or Ethernet. The system will:
- Sync automatically with your account.
- Manage punch patterns, shifts, and breaks without manual intervention.
3. Monitor Attendance
After successful setup, all attendance records—including clock-ins, clock-outs, and breaks—will be:
- Automatically recorded on time cards.
- Available for schedule management and reporting.
This simplifies tracking and ensures accurate attendance records.
4. Maintain Time Clock Device Within 100 Meters
For optimal performance, the time clock device should be:
- Positioned within 100 meters of the access control system.
- Kept in a location with a stable network connection.
Maintaining proximity ensures seamless attendance data recording.
5. Compatibility with Payroll Software
The system seamlessly integrates with payroll software like:
- BambooHR
- QuickBooks
This enables automatic time tracking, payroll reporting, and workforce management.
6. Connect with Face Reader Model
The access control system is designed to work with the Face Reader model, which:
- Uses facial recognition technology to verify individuals.
- Eliminates the need for keys, cards, or PIN codes.
- Enhances security and convenience for employees.
7. How the System Works
The access control system ensures secure and efficient entry by:
- Face Recognition Authentication
- When an authorized person approaches the door, the Face Reader scans their face.
- Upon successful recognition, the door automatically unlocks for entry.
- Auto Re-Locking Configuration
- Administrators can set a time delay for automatic re-locking after entry.
- This prevents unauthorized access and enhances security measures.
Users can adjust these settings based on security preferences and operational needs.
8. Emergency Exit Procedure
In emergencies, individuals can exit quickly and safely by following these steps:
- Locate the Emergency Exit Route
- Identify the nearest emergency exit.
- Use the Manual Exit Mechanism
- Press the exit button or lever near the door.
- The system will release the door lock.
- Exit the Premises
- Push the door open and proceed to the designated assembly point.
Emergency Preparedness
- All occupants should be trained on emergency exit procedures.
- Regular drills and training sessions can reinforce emergency response protocols.
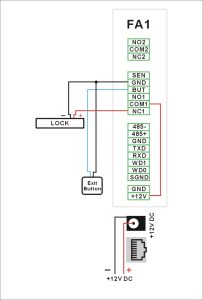
Illustration of System Configuration

Need Help?
If you encounter any issues or have questions regarding Setup, Payroll & Face ID of the Access Control System, please reach out to the NextGen Workforce Support Team for assistance.
📧 Support Contact: care@ngworkforce.com
🌐Visit Website : www.ngworkforce.com


